Monday, October 26, 2009

King and Rook checkmate


If you have only a king and rook left against your opponent's king, you can still get a checkmate.

The secret is to squeeze your opponent like a python into a corner. The rook forms two "fences" which your opponent's king cannot cross. The idea is to squeeze tighter with the rook whenever you can, but don't check, and don't give away your rook! Keep your king and rook together while you squeeze. If you can't squeeze with the rook, squeeze with the king. If you can't squeeze with either, make a waiting move - just like a python who waits for its victim to exhale, then squeezes tighter. You want to squeeze your opponent's king until he has only two squares. Watch out for stalemate when the king is in the corner. Let's look at all three positions before we look at the final checkmate.


Position 1 (above): Squeeze with the rook if you can. What's the best move?

Answer: Rd4 (Squeezes the enemy king's territory from 12 squares down to only 9 squares.

Position 2 (left): If you can't squeeze with the rook, squeeze with the king. What's the best move?

Answer: Kd4 (Squeezes the enemy king's territory from 12 squares down to only 10 squares. This prepares the way for Rd3 also.)
If you said Kc4, that's a good move too.


Position 3 (left): If you can't squeeze with the rook or the king, make a waiting move. What's the best move?

Answer: Ke5. Black will have to back up with his king allowing us either to squeeze with our rook or with our king.

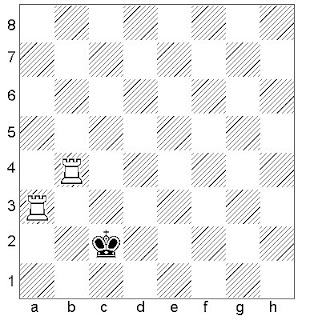
When you finally squeeze your opponent down to two squares, you're ready to begin the checkmate. In the diagram below, your rook is in the perfect position - trapping the black king into two squares (a1 and b1). It would be a huge mistake to move your rook to b2! Why? That's right - it's stalemate. (The king has no moves but it is not in check. A stalemate results in a draw and each player gets half a point.) Look at the position. There is a long fence (a2 and b2) and a short fence (c1) coming out from the rook trapping the king in the corner. You want your king across the long fence - on b3. So Kb3 is the correct move. Your King is now perfectly placed for checkmate on the "death square". Your two choices for the death square are b3 or c2, but your rook is alread on c2. The death square is the square you want your king to be on to help deliver checkmate. (The death square works in many other endgames as well - KBB vs K, or KBN vs K)

Sometimes the position ends up like in the final diagram. This usually fools most beginners.

But here's a general secret for finding good moves - Think, "Where would my opponent like to move?" Then don't let him move there. This simple rule will help you win many games.

Apply this rule to the diagram on the left. First, your king is now perfectly placed for the checkmate on the death square. So we don't want to move our perfectly placed King. The Black King would like to escape to c1, so don't let him. What's the correct move?

Answer: I hope you said Rc3 or Rc4 or Rc5 or Rc6 or Rc7 or Rc8. That forces Black into the corner where you can checkmate him next turn. How?

Answer: Rc1 checkmate!


Thursday, October 22, 2009

Checkmate with King and Queen


Although there are many ways to checkmate with a king and queen, the easiest method is to keep the king and queen together and march toward the enemy king until the king is sent reeling with its back to the wall against an edge of the board.

At this point you must be careful to avoid stalemate. The next step is to pin the king against the edge of the board with your queen. So if the king is on rank 1, you want your queen on rank 2. If the king is on rank 8, you want your queen on rank 7. If the king is on file a, you want your queen on file b. If the king is on file h, you want your queen on file g. If the king is in the corner, you must be careful not to stalemate with your queen - for example, if the King is on a1, a queen on b3 or c2 is stalemate.

In the above diagram, what is White's best move?
What are some of the worst moves?

Answer: Worst Kd3 or Ke3 which are both stalemate.
Other worst moves would be Qe2+, Qd1+, Qf2+,and Qf1+ which give away your queen.
Best move - Qg2 pinning the enemy king against the edge of the board.
Checkmate: 1. Qg2! Kd1 2. Kd3! Kc1 3.Qc2 checkmate. This is the position I call the
"Kiss of Death". (See the 3rd position below. The first position is also a "Kiss of
Death" position, this time in the corner.) There are several other basic checkmate
positions as shown below.

Checkmate with two rooks


Checkmate with two rooks (or sometimes a rook and a queen) is a common theme. Beginners should master the basic mates and this is one of the most basic. Start with just two rooks anywhere on the board and the opponent's King. Use a technique often called the ladder.
A rook creates a "fence" that the enemy king cannot get past. In the diagram on the left, the Black King cannot move up the board because of the rook on a5 which creates an impassable "fence" on the 5th rank. We'll use the other rook to create a fence on the 4th rank. Then we'll alternate rooks going down one rank at a time like climbing down a ladder.
1. Rb4+ Kd3
2. Ra3+ Kc2


Now we can't play Rb2 as we planned, so we'll have to find a safer place for that rook. Let's just go over to the other end of the board where we're save from the king.

3. Rh4 Kb2
4. Rg3! (not h3 which would block our other rook)
Kc2
5. Rh2+ Kd1
6.Rg1 checkmate!


Of course not every game ends so easily. Let's use the same theme to threaten mate and win. In the final diagram, can you find the winning sequence of moves for White?


Answer to last problem:
1. Rb1+ Rd1
2. Rh1+ Rf1
3. Rxf1+ Kxf1
4. Rxd1 (White now has an easy win.)

Tuesday, September 22, 2009

Hurdles


Two big pieces in a line?
Look out! It's hurdle time!

Begin your move search by looking for weaknesses in your opponent's position. One such weakness is two pieces in a line. This weakness can be exploited by putting an attacking piece on that same line. A hurdle occurs when you attack a big piece (especially a king) which must move out of the way. This exposes the piece behind to capture.
Here are two examples. On the left, what's the best way to stop the pawn from queening?
Below, how can you queen your pawn?

Answers: 1) If you said Rh1, try again since black plays Kb4. The correct answer is Ra7+
2) The way to figure out problems like this is to look for two pieces in a line. You start thinking, "If I move my rook, he takes my pawn ... but wait! That means he'll have two big pieces in a line!" Rh8! Hurdle time!


Monday, August 17, 2009

forks


Two big pieces on the same color square? Keep on looking, a fork is there.

The best way to find a good move, is to look for a weakness in the form of some pattern in your opponents position. For example, in today's lesson you are going to look for a fork. A fork is when you move a piece so that it attacks two enemy pieces simultaneously. The knight is the best at forking, so let's look at knight forks first. If the opposing King and Queen are on the same color square there is probably a fork waiting.

In this problem, find a good move for Black.

Practice by placing the King and Queen on the same color and finding a fork with a knight. Can you find the one pattern where you can't fork?

Answer: Nxc2+ forking the King Queen and Rook. Of course, we'll take the queen next turn.

Answer: Here's the only pattern where the King and Queen are on the same color square, but cannot be forked by a knight - unless they're too far apart.

Sunday, August 16, 2009

When the queen comes out,
Look all about!


When the queen comes out both sides need to be careful. One side must be careful not to lose the queen to a trap, the other must take care of all pieces - especially the king.

Here are two examples: 1.e4 e5 2.Nf6 Nc6 3.Bb4 Qg5 (This is too early to get the queen out. I try to wait until at least one minor piece has been taken.) 4.d3 Qxg2 5.Rg1 Qh3

Now what can white do? (see diagram 1)


In the second diagram, Black has again brought his queen out early. 1.e4 e5 2.Nf3 Nc6 3.Bb4 Nd4 4.Nxe5 Qg5 5.Nxe7 (saving the knight and forking the Q & R)

Now Black finished off White with a dazzling combination. Can you find it?


Answer 1 6. Bxf7+!! Ke8 2.Rg3 and the queen is trapped.

Answer 2 5. ... Qxg2 6.Rf1 Qxe4+ Be2 7.Nf3#

Saturday, August 15, 2009

Center

Don't fiddle Control the middle

At the beginning of the game, each move should help strengthen your grip on the four middle squares of the board. Advancing a rook pawn or knight pawn on the first move, or moving your knight to a3 or h3 would not help to control the middle. To ignore the middle, is to fiddle while Rome burns. Do not underestimate the power of attacking an empty square! Those 4 squares in the middle are crucial to dividing and conquering the opposing army.

In the Giuoco Piano opening (aka The Italian Game) 1.e4 e5 2.Nf3 Nc6 3.Bc4 Bc5 4.c3 Nf6, note how every move so far attacks one of the 4 center squares.

Sunday, August 9, 2009


A knight on the side
Gets fried.

This little poem is a reminder that knights generally belong toward the middle of the board where they have more choices.

Do the math -
A knight in the middle ... has 8 moves.
A knight on the side ... has 4 moves
A knight in the corner ... has 2 moves.

What's the right move for White?

Answer:
The knight is on the side. Let's fry it! It only has 4 choices and our bishop, properly placed, can guard all four squares. Bd5! Now the knight can't move without getting taken by the Bishop and next turn we'll play b4 with a deadly attack. Good night, bad knight!

Friday, August 7, 2009

When you're in check
There's 3 ways to save your neck!


Most beginners instinctively move their King when they are in check, but that's usually not the best way out of check. First see if you can take the piece, then look to see if you can block the check, and lastly find all the squares your King could escape to. Finally decide which is best.

In this problem Black must figure out the best way out of check.


Answer:
1. Kh7 If Black plays QxB he loses his queen. If he blocks with his Queen, he loses it. If he blocks with his pawn, White plays hxg6 (en passant - remember that rule?) and has a really rare double check - both the bishop and rook will be checking the king. The only way out is Kg7 which will lose because White plays Rh7+ winning the Black Queen next turn.

Intro

Why learn chess?
It teaches patience
It exercises the imagination
It teaches decision-making
It improves spacial visualization
It trains you in time-management
It improves your empathy
It teaches you not to judge others based on first impressions
Chess will enhance your social life
Finally, you're simply not educated unless you can play the game

You probably already enjoy beautiful art and music.
Why not open up a new world in which you can appreciate beauty?


First learn the basic rules. It's fairly simple. I recommend the following order.
How the Rook moves
How the Bishop moves
How the Queen moves
How the King moves
How the Knight moves
How the pawn moves
Checkmate
Stalemate
Castling
En Passant

The game of chess is often discussed in terms of the three phases of the game:
1) The Opening when the primary emphasis is developing your pieces as quickly as possible.
2) The Middle Game when the attacks take place and tactics abound.
3) The End Game when the primary focus is on queening a pawn.

Two other terms related to chess are tactics and strategy. Chess tactics are the good moves that will gain a piece, or get a checkmate in a few moves. Strategy is more long-term planning and strengthening of your position.